Login

New user? Create an account
Forgot your password? Get it back!

Sign up

Already a member? Login

2FA

2-Factor Authentication is enabled for this account
Login with a different user

Email Confirmation

Send confirmation email to the following
Login with a different user
Automations - Operators
Last updated: 06 September 2024

Accessing Symbient AI

Automations

Automations enable you to design and configure the sequence of Actions to be executed automatically, based on triggers or conditions. These automated workflows, or Automation Flows, consist of individual steps called Operators, which can perform a wide range of tasks such as processing emails, running Activities, interacting with LLM models, or exchanging data with webhooks. By combining and chaining these Operators together, you can create customized Automations to streamline processes, optimize workflows, and enhance overall efficiency.

  1. Click on the Toolbox icon on the left-hand Menu Bar to get to the Toolbox.
  2. Click on the Automations tool inside the Toolbox.

Configuring Automations

  1. Add a new Automation or select an existing Automation from the table.
    • To add a new Automation, click the Add button in the top-left of the Automations window.
  2. Fill in the Automation Details:
    • Name: Enter a name to identify your Automation.
    • Automation Is Active?: Check this box to activate the Automation and allow it to be triggered. The Trigger Operator will control how the Automation is initialized.
    • Description (Optional): Provide a text description of this Automation to help users quickly understand its function.
  3. Save the configuration:
    • Click the Save button in the bottom-right corner of the Automation Details window. Note that when creating a new Automation, the details page must be saved before you can access the Flow tab and History tab.

Flow Tab

The Flow tab is where the Automation Flow for the Automation is set up. This controls the logic for the Automation, which will perform its actions in order from top to bottom. There are two kinds of Operators: Triggers and Actions. Each Automation Flow will start with one Trigger Operator followed by a series of Action Operators.

Using the Flow Tab

  • In the Flow tab, a list of Operators is available on the left side of the screen. You can hide or show this list by clicking the double arrow tab near the top of the Operators panel.
  • To use an Operator, drag it from the Operators panel onto the Automation Flow view screen. Once placed, the properties panel for this Operator will open on the right side of the window, allowing you to configure its settings.
  • The buttons to the right of the Operators panel can be used to control the view of the Automation Flow. Use the "+" and "-" buttons to zoom in and out, and the box button to reset the view to the closest zoom possible.


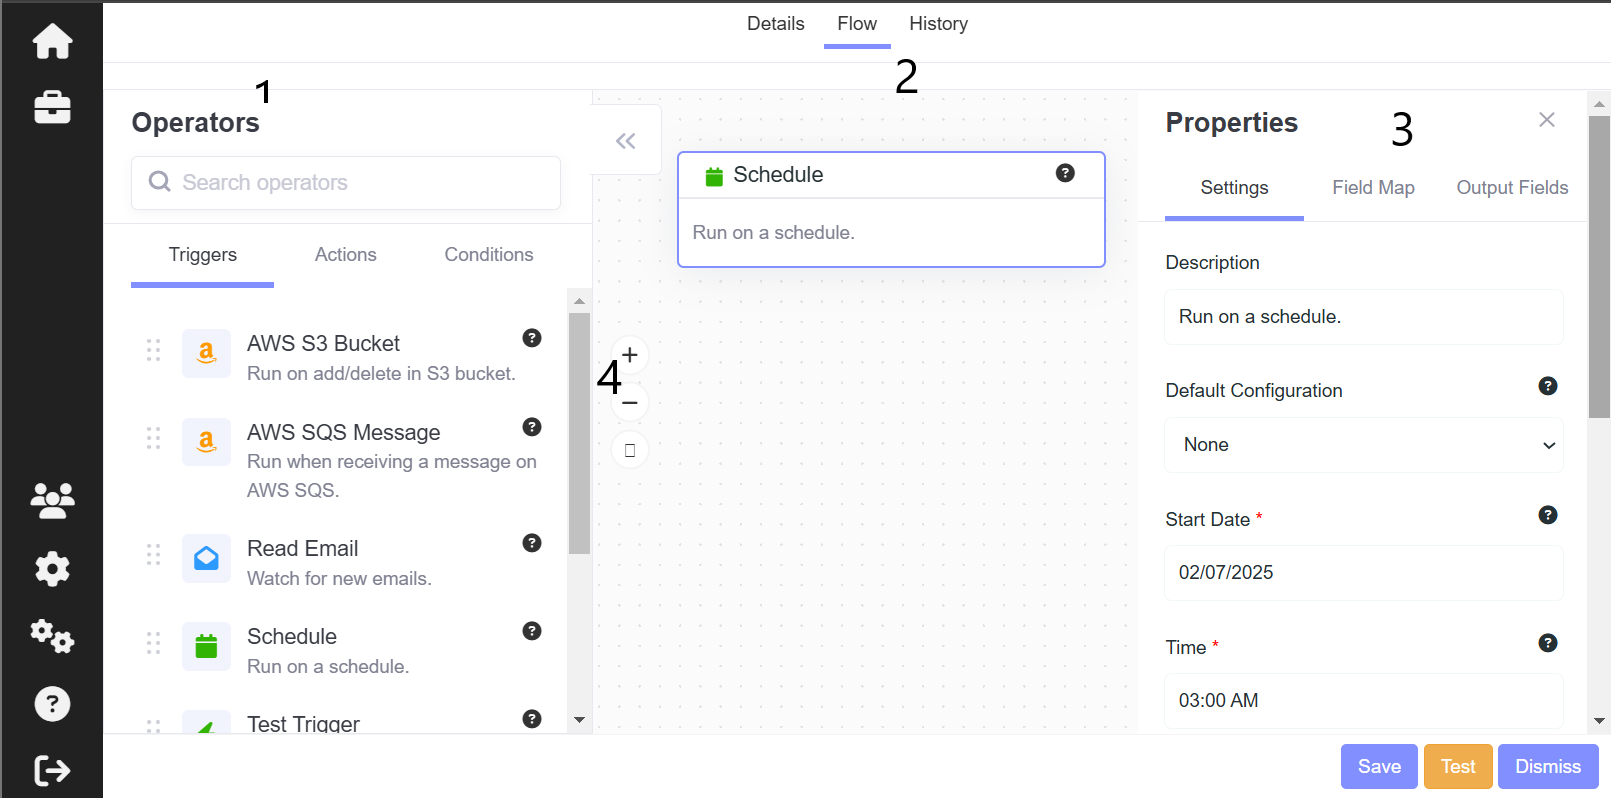
Using the Flow Tab (Shown above)

  1. Operator List: A list of Operators is available on the left side of the screen. To hide or show this list, click the double arrow tab near the top-left of the Operators window.
  2. Automation Flow: Drag an Operator from the Operators panel onto the Automation Flow panel in the center of the window. Once placed, the properties panel for this Operator will open on the right side of the window.
  3. Operator Properties: This panel shows the details of the currently selected Operator. It includes the Settings, Field Map, and Output Fields tabs.
  4. View Controls: The buttons to the right of the Operators panel can be used to control the view window for the Automation Flow.
    • The "+" and "-" buttons cause the Flow to zoom in and out.
    • The box button will reset the view to the closest zoom possible.

For more details about the Flow tab, please see Working With The Automation Flow.

History Tab

The History tab shows instances where the current Automation was triggered or tested.

  1. To see more details about an entry, click the green "+" button on the left side of the table. This will show a breakdown of each Operator that ran and the status of the Automation at that time.
  2. Within the details of an entry, you can click the double arrow next to each Operator to show additional details about that Operator.
  3. Press the Refresh button in the top-left of the window to retrieve any recent instances of the Automation being triggered or tested.

Important: Our servers use GMT time for any scheduling-related actions to maintain standardization between servers, users, and our team.

Working With The Automation Flow Tab

The Automation Flow Tab is a powerful and flexible tool used for creating customized and efficient automation flows. Each operator provided in the Flow Tab has unique properties and potential configurations, allowing for endless possibilities in automating tasks and processes.

To make the most of the Flow Tab, start by outlining your automation goals and breaking down complex workflows into manageable steps. This simplifies the configuration process and allows you to create Automations tailored to your specific needs.

Tips for Working With the Automation Flow Tab

  1. Start simple: Begin with a basic Automation Flow to familiarize yourself with the interface and Operator functionalities. You can gradually add more complexity as you become more comfortable with Automations.
  2. Use descriptions: Utilize the description fields for Operators and Automations to describe their purpose and functionality. This can be helpful for future reference and for other team members who may work on the Automation.
  3. Test frequently: Regularly test your Automation at different stages of development. This helps identify any issues early and ensures each part of the Automation is working as expected.
  4. Reference the documentation: Refer to the detailed documentation for each Operator to understand the specific configurations and use cases.
  5. Be mindful of the Field Map tab: The Field Map tab allows you to dynamically link properties between Operators. This can create powerful Automation Flows, but requires careful planning to ensure the data flows correctly between steps.
  6. Utilize the Output Fields tab: Check the Output Fields tab to understand what data each Operator can provide to downstream Operators.

Operator Properties

When you select an Operator within your Automation Flow, a Properties panel will open on the right side of the window. This panel is used to control the settings of the selected Operator. Below is a quick overview of the three tabs within the Operator Properties panel.

Settings Tab

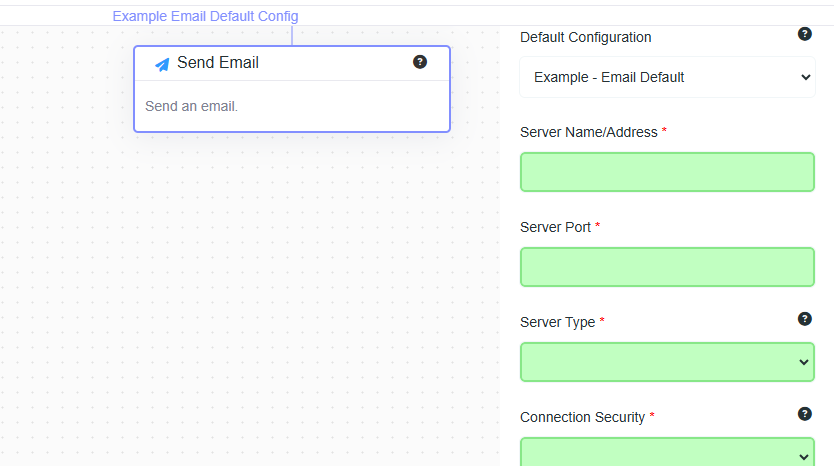
The Settings tab is the main tab for controlling the inputs for your Operator’s properties. All of the properties are shown with any applicable fields or dropdown menus for entering values. Any values entered here are considered "static values" and will remain constant throughout the Operator's execution.

Field Map Tab

Within the Field Map tab, you can set a property from the Settings tab to use any generated output from an Operator higher up in the Automation Flow. When a property is set here, it becomes “locked” on the Settings Tab, indicating that the field has been “mapped.”

Clearing Field Maps: To clear a selected value from a Field Map, click the blank entry that appears as the first selection in the dropdown options.

Output Fields Tab

This tab shows the available output fields that the selected Operator will provide, along with the names of those fields. This can be used for quick reference when setting up field mappings and to double-check that an Operator has the correct outputs you are expecting.

Operator Details

Trigger Operators

Trigger Operators are essential components in Automation Flows, as they initiate the flow based on various actions or sources. These sources may include predetermined schedules, webhooks, or emails. It's important to note that only a single Trigger Operator can be incorporated into an Automation Flow. Unlike other operators, Triggers do not require field mappings due to their position at the beginning of the flow.

The currently available Trigger Operators include:

  • AWS S3 Bucket: Activate when an object is added or deleted from an AWS S3 Bucket.
  • Read Email: Activate when an email arrives at the specified inbox.
  • Schedule: Activate at a specific time, date, or weekly schedule.
  • Transcription: Activate when a new Transcription has been created or imported.
  • Webhook: Activate when an external application calls the Automation’s webhook endpoint.

Important: Our servers use GMT time for any scheduling-related actions to maintain standardization between servers, users, and our team.


AWS S3 Bucket

This Trigger operator will activate when an object is added or deleted to/from the specified AWS S3 Bucket. This uses an AWS Simple Queue Service (SQS) URL to watch for changes and activate when the specified event occurs within the target bucket.

Input Fields (Settings)

  • On Event: This dropdown specifies the event that the trigger will be associated with. The options are:
    • Add: The trigger runs when an object is added to a bucket.
    • Delete: The trigger runs when an object is removed from a bucket.
  • Region: This is the region for your AWS S3 Bucket. This must match the details entered when setting up your AWS S3 bucket. For example, “us-east-1”.
  • AWS Access Key ID: The AWS Access Key ID for accessing the AWS S3 bucket. This field is required for authentication.
  • AWS Secret Access Key: The AWS Secret Access Key for accessing the AWS S3 bucket. This field is required for authentication.
  • Bucket Name: The name of the AWS S3 bucket that will be monitored. Any updates with a matching event in this bucket will activate the Trigger.
  • Amazon SQS URL: The URL of the AWS Simple Queue Service (SQS) that is associated with your AWS S3 Bucket.

For more information about using AWS Simple Queue Service (SQS) to activate an Automation, please see the AWS documentation: What is Amazon Simple Queue Service.

Output Fields

  • Event: The event associated with this Trigger. It can either be Add or Delete.
  • Region: The AWS region of the AWS S3 bucket.
  • AWS Access Key ID: The AWS Access Key ID used for accessing the AWS S3 bucket.
  • AWS Secret Access Key: The AWS Secret Access Key used for accessing the AWS S3 bucket.
  • Bucket Name: The name of the AWS S3 bucket from which the object was retrieved.
  • File Name: The name (key) of the retrieved file.
  • AWS SQS URL: The URL of the AWS Simple Queue Service (SQS) that is associated with your AWS S3 Bucket.

Read Email

The Read Email operator enables the Automation flow to detect and respond to incoming emails. This operator triggers an automation workflow based on the arrival of an email at a specified email address. In order to use the Read Email operator, an IMAP or POP3 mail server login is required.

Using the Read Email operator, you can create sophisticated Automation flows that react to incoming emails and take desired actions based on the email content or sender. For example, you can create a workflow that sends a response email to incoming job applications or notifies you when a specific email is received.

Input Fields (Settings)

  • Server Name/Address: This is the server name or IP address of the mail server. This can be found by looking up information about the mail server for your intended email.
  • Server Port: This is the port used for the mail server. This can be found by looking up information about the mail server for your intended email.
  • Server Type: This is the protocol that the mail server uses. The supported mail server protocols are IMAP or POP3.
  • Connection Security: The encryption method the mail server uses. The supported encryption methods are SSL/TLS and STARTTLS.
  • Username: This is the name of the email account for this mail server. The username must be a full email address, e.g., “user@example.com.”
  • Password: The password for the email account, e.g., “ExamplePassword1234.”

Output Fields

  • Date Received: The time and date the email was sent.
  • Server Name/Address: The mail server name or IP address used to send the email.
  • Server Port: The port of the mail server used to send the email.
  • Server Type: The mail server protocol, either IMAP or POP3.
  • Connection Security: The encryption method the mail server uses, either SSL/TLS or STARTTLS.
  • Username: The email account attached to the mail server used to send the email.
  • Password: The password for the email account.
  • From: The email account that the email was sent from.
  • To: The email account that the email was sent to.
  • Message Body: The body of the sent email.
  • Message Subject: The subject of the sent email.

Schedule

The Schedule operator activates the Automation flow at a specific date and time. The schedule can be set to repeat at regular intervals such as hourly or weekly. The time provided will be based on the GMT timezone.

Important: Our servers use GMT time for any scheduling-related actions to maintain standardization between servers, users, and our team.

Input Fields (Settings)

  • Start Date: The calendar date to start this Automation. Click to open a date selection widget.
  • Time: The time of day to start this Automation. Click to open a time selection widget.
  • Repeats: Whether this Automation will repeat and the interval at which it will repeat. Click to open a dropdown menu that will show the following options:
    • No: The Automation will not repeat.
    • Hourly: The Automation will repeat every hour.
    • Daily: The Automation will repeat every day.
    • Weekly: The Automation will repeat every week.
    • Monthly: The Automation will repeat every month.
    • Yearly: The Automation will repeat every year.
  • Ends: If this Schedule Operator is set to repeat, this field will control when the repeat ends. Click to open a dropdown menu that will show the following options:
    • Never: The Automation will not stop repeating.
    • After Occurrences: The Automation will stop after a specified number of occurrences.
    • After Date: The Automation will stop on a specified date.
  • Occurrences: If "Ends" is set to After Occurrences, then this field will control how many occurrences of this Automation will run.
  • End Date: If "Ends" is set to After Date, then this field will control what date the Automation will stop running.

Note: When an Automation runs and reaches the specified repeat limit or isn't set to reoccur, it will set itself to inactive automatically.

Output Fields

  • Date: The date that the Automation ran. Will output as “dd/mm/yyyy” format.
  • Time: The time that the Automation ran. Will output as “12:30 pm” format.

Transcription

The Transcription operator activates the Automation flow when a Transcription is successfully processed. This means that it will run when the status of the Transcription becomes "Complete".

Input Fields (Settings)

  • Transcript ID: This field can be used to specify a target Transcript to run this Automation on. This is mainly for testing purposes, because the ID of the Transcription that finished processing will be passed instead when the Automation is triggered without using the Test button.

Output Fields

  • Transcript ID: The ID of the Transcription that was processed. If this Automation was run with the Test button, then it will use the provided value in the Settings tab.
  • Transcription: The full text of the Transcription. This will include everything, such as timestamps and speaker names.
  • Reference Label: The reference label for the Transcription that was processed. This is essentially the “name” given to the Transcription.
  • Description: The description associated with the Transcription that was processed.
  • Status: The current status of the Transcription that was processed.
  • Speakers: The names of any speakers associated with the Transcription that was processed.
  • Tags: Any tags that were applied to the Transcription that was processed.
  • Created: The date and time when the Transcription that was processed was created/uploaded.

Webhook

The Webhook operator activates the Automation when a webhook endpoint is called with an HTTP POST request. The URL for this webhook will be generated when the Automation is opened. If you accidentally remove the Webhook Trigger, the address will remain the same.

Input Fields (Settings)

  • Endpoint Address: This will be the URL that will be called to activate this Webhook. The HTTP request to this endpoint should be a POST request with a payload. Examples of this formatting can be found in the example below.
  • Payload: This field can be used to simulate receiving a JSON payload to the webhook address. This is for testing purposes and will only be active when pressing the Test button.

Output Fields

  • Address: The static endpoint address for this webhook. This is the same as the address used to trigger the webhook operator.
  • Payload: This is the payload that was included with the HTTP request. This will be the full JSON object that was received. This can be parsed using the JSON Parser Action.

Action Operators

Action Operators are used to continue the Automation Flow after the Trigger Operator is activated. Actions include a wide variety of functions such as running an Activity, scraping a website, transcribing audio, or sending an email.

The available Action Operators are:

  • Activity - Perform a predefined Activity from the list of currently active Activities.
  • Add/Map Fields - Create one or more Output Fields populated with data that can be used by other Operators.
  • Aggregator - Combine data from multiple Operators into a single JSON object that can be passed to other Operators.
  • AWS S3 DELETE - Delete an object from an AWS S3 bucket.
  • AWS S3 GET - Get an object from an AWS S3 bucket.
  • AWS S3 PUT - Update an object within an AWS S3 bucket.
  • Call Webhook - Send a JSON object to a webhook endpoint.
  • Classify - Run a Classification Model on the given text.
  • Fuzzy Matcher - Perform a fuzzy match comparison between two inputs.
  • HTTP GET - Submit a GET request to the specified address.
  • HTTP POST - Submit a POST request with a payload to the specified address.
  • HTTP PUT - Submit a PUT request with a payload to the specified address.
  • JSON Parser - Parse JSON data to be used for other Operators.
  • LLM - Send text to an LLM Model for inference.
  • Save Draft - Save an email draft.
  • Scrape Website - Scrape a website for text data.
  • Send Email - Send an email using an email SMTP server.
  • Transcribe Audio - Send an audio file to be transcribed by Symbient ASR.
  • Transcription History - Append an output to the Activity tab of a Transcription.
  • Transcription Lookup - Access a Transcription that has already been processed.
  • Transcription Update - Save a Transcription and update the text.

Activity

The Activity operator is a key component of the automation flow in Symbient AI, enabling you to incorporate pre-defined instructions, or "Activities," into your automation process. These Activities allow your automation to interact with a large-scale language model (LLM) to perform tasks such as text processing, analysis, context understanding, and data extraction.

The Activity operator executes a chosen Activity and returns a response, which contains the results or data generated by the Activity. This response can be further processed or analyzed to enhance your automation workflow. Use the Activity operator when you need to perform advanced tasks such as text analysis, context understanding, and data extraction with the assistance of an LLM.

Input Fields (Settings / Field Map)

  • Activity: This field must be mapped to an active, pre-made activity that the user has saved in the Activities section. The activity must be active for it to be used. Refer to the Activities documentation for details on creating, managing, and activating activities.
  • Input: Provide the necessary input data required for the selected activity. This should be formatted according to the requirements of the specific activity.

Output Fields

  • Response: This field contains the response from the activity performed. It typically includes the results or data generated by the activity, which can be used for further processing or analysis.

Add/Map Fields

The Add/Map Fields operator is used to manipulate data before it is passed onto the next step in the flow. It allows you to add, remove, or modify fields in the data, making it easier to work with and ensuring that the information is formatted correctly for the subsequent steps. This is particularly useful when you have complex data structures or when you need to transform the data in some way before it is used by other components in the flow.

Input Fields (Settings / Field Map)

  • Add Field Button (+): Use the plus button to add a new field entry to the end of the current list. There will be two text boxes associated with each entry as described below:
    • Field Name: This will be the name shown within the field map selection tab to reference this value.
    • Field Value: This will be the value output when the field is accessed by another Action. This can be a value set as a Field Map from another Operator or a static text value specified in the Settings tab.

Output Fields

  • The Output tab for an Add/Map Fields Operator will show any added fields and the field names applied to them.

Aggregator

The Aggregator operator is used to gather and consolidate data from multiple sources or steps in the flow. It combines multiple Actions into a single output, making it easier to manage and analyze the information. This can be particularly useful when working with large amounts of data or when multiple steps in the flow are generating similar information. The results are combined into a single JSON object. This object will be available in the Outputs and can be passed to other Operator Actions.

Input Fields (Settings / Field Map)

  • Add Field Button (+): Use the plus button to add additional fields as needed for the aggregation.
  • Field Name: Enter the name that will be used to reference this field within the output JSON object. Then go to the Field Map tab to select the value for this field. The full text of what is passed into the field will be included in the output. So if the input is JSON, that full JSON object will be entered as the value for that field.

Important: Each field added to the Aggregator will be empty (undefined) unless you set the value to a field mapping in the Field Map tab.

Output Fields

  • Output: The output JSON object containing each input field and the associated value.

AWS S3 DELETE

The AWS S3 Delete operator is used for removing objects from an Amazon S3 bucket in an automation flow. This can be beneficial when you want to clean up, remove expired or unnecessary files, or maintain a specific number of files in your S3 bucket. By incorporating the AWS S3 Delete operator into your automation flow, you can automate the process of deleting objects, ensuring that your S3 bucket stays organized and optimized.

Input Fields (Settings / Field Map)

  • Region: The AWS region where the S3 bucket is located.
  • AWS Access Key ID: The AWS Access Key ID for accessing the S3 bucket.
  • AWS Secret Access Key: The AWS Secret Access Key for accessing the S3 bucket.
  • Bucket Name: The name of the S3 bucket from which the object will be deleted.
  • File Name (Key): The name (key) of the file to be deleted from the S3 bucket.

Output Fields

  • Region: The AWS region of the S3 bucket.
  • AWS Access Key ID: The AWS Access Key ID used for accessing the S3 bucket.
  • AWS Secret Access Key: The AWS Secret Access Key used for accessing the S3 bucket.
  • Bucket Name: The name of the S3 bucket from which the object was deleted.
  • File Name: The name (key) of the deleted file.

AWS S3 GET

The AWS S3 Get operator is used for retrieving objects from an Amazon S3 bucket in an automation flow. This can be helpful when you want to access, analyze, or process files stored in your S3 bucket. By incorporating the AWS S3 Get operator into your automation flow, you can automate the process of retrieving objects, making it easier to manage and work with your data.

Input Fields (Settings / Field Map)

  • Region: The AWS region where the S3 bucket is located.
  • AWS Access Key ID: The AWS Access Key ID for accessing the S3 bucket.
  • AWS Secret Access Key: The AWS Secret Access Key for accessing the S3 bucket.
  • Bucket Name: The name of the S3 bucket from which the object will be retrieved.
  • File Name (Key): The name (key) of the file to be retrieved from the S3 bucket.

Output Fields

  • Region: The AWS region of the S3 bucket.
  • AWS Access Key ID: The AWS Access Key ID used for accessing the S3 bucket.
  • AWS Secret Access Key: The AWS Secret Access Key used for accessing the S3 bucket.
  • Bucket Name: The name of the S3 bucket from which the object was retrieved.
  • File Name: The name (key) of the retrieved file.
  • File Size: The size of the retrieved file.
  • File Type: The type of the retrieved file.
  • File Content: The content of the retrieved file.

AWS S3 PUT

The AWS S3 Put operator is used for uploading objects to an Amazon S3 bucket in an automation flow. This can be helpful when you want to store new files or other content in your S3 bucket. By incorporating the AWS S3 Put operator into your automation flow, you can automate the process of uploading objects, making it easier to manage and work with your data.

In an automation flow, the AWS S3 Put operator can be used in a variety of ways, such as:

  • Uploading new files created during an Automation to your S3 bucket.
  • Automating the process of archiving or backing up files from other systems or applications to your S3 bucket.
  • Ensuring that new files are uploaded to your S3 bucket when needed, such as after a certain event or based on a schedule.

Input Fields (Settings / Field Map)

  • Region: The AWS region where the S3 bucket is located.
  • AWS Access Key ID: The AWS Access Key ID for accessing the S3 bucket.
  • AWS Secret Access Key: The AWS Secret Access Key for accessing the S3 bucket.
  • Bucket Name: The name of the S3 bucket where the object will be stored.
  • File Name: The name (key) of the file to be stored in the S3 bucket.
  • File Content: The content of the file to be stored in the S3 bucket.

Output Fields

  • Region: The AWS region of the S3 bucket.
  • AWS Access Key ID: The AWS Access Key ID used for accessing the S3 bucket.
  • AWS Secret Access Key: The AWS Secret Access Key used for accessing the S3 bucket.
  • Bucket Name: The name of the S3 bucket where the object was stored.
  • File Name: The name (key) of the stored file.

Call Webhook

The Call Webhook operator is used for invoking a webhook in an automation flow. A webhook is a way for an app to provide other applications with real-time updates. In the context of an automation flow, the Call Webhook operator enables you to connect different applications or services by sending an HTTP request to a specified URL in JSON format.

This can be helpful for triggering actions or events in other tools, sharing data between systems, or automating tasks that require interaction between multiple platforms.

Input Fields (Settings / Field Map)

  • Endpoint Address: This is the URL endpoint where the JSON object will be sent. The URL should be a valid web address where the server can handle and respond to webhook requests.
  • Payload: The data that you want to send to the server in the body of the request. This should be formatted as JSON.

Output Fields

  • Response: This field contains the body of the HTTP response received from the server. It typically includes the data returned by the server after processing the request.
  • Status Code: This field captures the HTTP status code returned by the server. Status codes indicate the result of the request. For example: 200 (for success), 404 (for not found).

Classify

The Classify operator allows for integration of classification models into your Automation flows. These models can predict a wide range of class labels based on specific inputs, such as customer behavior, transaction analysis, or image recognition.

Input Fields (Settings / Field Map)

  • Model: This is the Classify Model you want to use to classify the input.
  • Input: The input is the content that will be classified by the Classify operator.

Output Fields

  • Response: This field contains the results of the Classify operation.

Concatenate Strings

The Concatenate operator allows your Automation to combine multiple strings into a single, unified string. This single string can then be used by other operators or sent to external systems or applications, making it a useful tool for data manipulation and analysis tasks.

Input Fields (Settings / Field Map)

  • Separator: Character used to separate the strings. is allowed.
  • Add Field Button (+): Use the plus button to add the strings you want to concatenate together.

Output Fields

  • Output: This is the resulting string of data produced by the Concatenate Strings operator.
  • Separator: Character used to separate the inputs.

Fuzzy Matcher

The Fuzzy Matcher operator is a feature in automation flows that helps match similar or related data or strings based on their similarity or closeness in terms of spelling, meaning, or context. It is used when you need to find a close match for a given input or when the exact match is not available or not certain. By providing a "match score," the Fuzzy Matcher operator helps improve the accuracy and efficiency of data processing and comparison tasks in an automation flow, especially when dealing with large datasets or inputs with typographical errors, misspellings, or minor variations.

Input Fields (Settings / Field Map)

  • Input 1: This is the input that you want to compare against Input 2.
  • Input 2: This is the input to compare against Input 1.

Output Fields

  • Output: The output JSON object contains each input field with its associated value and the match score.

HTTP GET

The HTTP GET operator is an action used in automation flows to retrieve data from external resources on a server. By sending an HTTP GET request to a specified URL, the operator allows you to access and retrieve data from various systems, which can then be utilized throughout the rest of your automation flow.

You should use the HTTP GET operator when you need to collect data from an external source, such as a web API or a database, and incorporate it into your automation workflow.

Examples of when to use it include:

  • Retrieving real-time data for monitoring and analysis purposes.
  • Gathering information from a third-party system to be processed and used within your automation flow.
  • Synchronizing data between multiple systems in your organization.

Input Fields (Settings / Field Map)

  • Address: This is the URL endpoint where the HTTP GET request will be sent. The URL should be a valid web address where the server can handle and respond to GET requests.
  • Headers (1 per line): Headers provide additional information to the server about the request. Enter each header on a new line in the format 'Key: Value.' Common headers include authorization tokens, content types, and custom headers required by the API.

Output Fields

  • Response: This field contains the body of the HTTP response received from the server. It typically includes the data requested through the GET operation.
  • Status Code: This field captures the HTTP status code returned by the server. Status codes indicate the result of the HTTP GET request. For example: 200 (for success), 404 (for not found).

HTTP POST

The HTTP POST operator is an action used in automation flows to send data to a server for creation, modification, or deletion purposes. By sending an HTTP POST request to a specified URL, the operator allows you to interact with a server and perform various actions, such as creating records, updating information, or deleting resources.

You should use the HTTP POST operator when you need to communicate with a server to create, modify, or delete data.

Examples of when to use it include:

  • Sending new data to a server for processing or storage.
  • Updating existing records in a database or API.
  • Deleting unwanted data or resources from a server.

Input Fields (Settings / Field Map)

  • Address: This is the URL endpoint where the HTTP POST request will be sent. The URL should be a valid web address where the server can handle and respond to POST requests.
  • Content Type: Specify the media type of the resource being sent to the server. This field is mandatory and must be selected from the list of supported content types.
  • Supported Content Types:
    • application/json
    • application/xml
    • application/pdf
    • image/gif
    • image/jpeg
    • image/png
    • image/tiff
    • multipart/mixed
    • multipart/alternative
    • multipart/form-data
    • text/css
    • text/csv
    • text/html
    • text/plain
    • text/xml
    • video/mpeg
    • video/mp4
    • video/quicktime
    • video/x-ms-wmv
    • video/x-flv
    • video/webm
  • Headers (1 per line): Headers provide additional information to the server about the request. Enter each header on a new line in the format 'key: value'. Common headers include authorization tokens, content types, and custom headers required by the API.
  • Payload: The data that you want to send to the server in the body of the POST request. This should be formatted according to the specified Content Type.

Output Fields

  • Response: This field contains the body of the HTTP response received from the server. It typically includes the data requested through the POST operation.
  • Status Code: This field captures the HTTP status code returned by the server. Status codes indicate the result of the HTTP POST request. For example: 200 (for success), 404 (for not found).

HTTP PUT

The HTTP PUT operator is an action used for creating, updating, or replacing existing resources on the server. This operator is similar to the HTTP POST operator, but with some key differences.

The primary function of the HTTP PUT operator is to update or replace an existing resource on the server, while the HTTP POST operator is generally used for creating new resources or performing other actions. The main difference between them is the semantics of the request: a PUT request replaces the entire resource, while a POST request may create a new resource or modify an existing one.

You should use the HTTP PUT operator when you need to update or replace an existing resource on the server with the new data provided.

Examples of when to use it include:

  • Updating a record in a database or API with new information.
  • Replacing a file on a server with an updated version.
  • Changing the settings or configuration of a server resource.

Input Fields (Settings / Field Map)

  • Address: This is the URL endpoint where the HTTP PUT request will be sent. The URL should be a valid web address where the server can handle and respond to PUT requests.
  • Content Type: Specify the media type of the resource being sent to the server. This field is mandatory and must be selected from the list of supported content types.
  • Supported Content Types:
    • application/json
    • application/xml
    • application/pdf
    • image/gif
    • image/jpeg
    • image/png
    • image/tiff
    • multipart/mixed
    • multipart/alternative
    • multipart/form-data
    • text/css
    • text/csv
    • text/html
    • text/plain
    • text/xml
    • video/mpeg
    • video/mp4
    • video/quicktime
    • video/x-ms-wmv
    • video/x-flv
    • video/webm
  • Headers (1 per line): Headers provide additional information to the server about the request. Enter each header on a new line in the format 'Key: Value.' Common headers include authorization tokens, content types, and custom headers required by the API.
  • Payload: The data that you want to send to the server in the body of the PUT request. This should be formatted according to the specified Content Type.

Output Fields

  • Response: This field contains the body of the HTTP response received from the server. It typically includes the data requested through the PUT operation.
  • Status Code: This field captures the HTTP status code returned by the server. Status codes indicate the result of the HTTP PUT request. For example: 200 (for success), 404 (for not found).

JSON Parser

The JSON Parser operator is used by your Automation to extract data from a JSON-formatted data source for further processing or analysis. JSON, or JavaScript Object Notation, is a popular data interchange format that stores information as key-value pairs.

Using the JSON Parser operator, your Automation can parse a JSON object and extract specific keys and their values. This allows you to work with individual data points in your JSON object without needing to deal with the entire object.

Input Fields (Settings / Field Map)

  • JSON Object: This is the JSON object that is to be parsed.
  • Add Field Button (+): Use the plus button to add the JSON Keys you want to parse.

Output Fields

  • Output: For each JSON Key added in the Settings, the Key and the associated value are part of the output.

LLM

The LLM operator allows your automation to interact directly with a Large Language Model (LLM) for processing tasks. It is designed to send text prompts and instructions to an LLM, receive a response, and return the output. Unlike the Activity operator, the LLM operator allows you to use dynamic text prompts and instructions to interact with the LLM.

You may want to use the LLM operator when you need to:

  • Perform complex natural language processing tasks that require advanced AI models, such as generating text, answering questions, or summarizing information.
  • Leverage the power of advanced LLMs to enhance your applications by providing them with the ability to understand and generate human-like text.
  • Obtain insights or data from external sources that cannot be processed or generated by your existing AI models.

Input Fields (Settings / Field Map)

  • Prompt: The text prompt that you want to send to the LLM for processing. This field is mandatory and must contain the main query or request.
  • Instructions: Additional instructions or context to guide the LLM's response. This field is optional and can be used to refine the output.
  • Models: Select the specific LLM model to use for inference. LLM models must be predefined and available in the system. Refer to the LLM Models documentation for details on creating and managing LLM models.
  • Actor: Select the specific actor to be used by the LLM models to refine its response mechanism. It must be predefined and available in the system. Refer to the AI Actor documentation for details on creating and managing an AI Actor.

Output Fields

  • Prompt: The text prompt sent to the LLM for processing.
  • Instructions: The instructions or context used to guide the LLM's response.
  • Models: The specific LLM model used for inference.
  • Actor: The actor used by the LLM models to refine its response mechanism.
  • Response: This field contains the response from the LLM. It typically includes the results or data generated by the LLM, which can be used for further processing or analysis.

Save Draft

The Save Draft operator is used to save an email draft to an email account as part of your Automation flow. This email can then be reviewed and managed by the owner of the email account at a later time. The Save Draft operator can be used in various scenarios, such as when you want the automation to create a draft of an email and save it for later editing, or when you want the automation to create an email that needs to be reviewed before sending.

Input Fields (Settings / Field Map)

  • Server Name / Address: This is the server name or IP address of the mail server. This can be found by looking up info about the mail server for your intended email.
  • Server Port: This is the port used for the mail server. This can be found by looking up info about the mail server for your intended email.
  • Server Type: This is the protocol that the mail server uses. The supported mail server protocols are IMAP or POP3.
  • Connection Security: The encryption method the mail server uses. The supported encryption methods are SSL/TLS and STARTTLS.
  • Username: This is the name of the email account for this mail server. The username must be a full email address. Ex: “user@example.com”.
  • Password: The password for the email account. Ex: “ExamplePassword1234”.
  • From: The email account to send mail from. You must have already established permissions to be able to send emails from this address on the server. Set this to your original email if you do not want to modify the address.
  • To: The email accounts to send mail to, separated by commas.
  • CC: Email accounts to CC emails to, separated by commas. This is an optional field.
  • BCC: Email accounts to BCC emails to, separated by commas. This is an optional field.
  • Subject: The subject of the email.
  • Body: The message body of the email.

Output Fields

For the “Save Draft” operator, most of the Output fields will be the same as the values used within the Settings or Field Maps tabs. The only Output that is newly generated is the “Date Saved” field.

  • Date Saved: The time and date the email was saved.
  • Server Name/Address: The mail server name or IP address used to save the email.
  • Server Port: The port of the mail server used to save the email.
  • Server Type: The mail server protocol. Either IMAP or POP3.
  • Connection Security: The encryption method the mail server uses. Either SSL/TLS or STARTTLS.
  • Username: The email account attached to the mail server used to save the email.
  • Password: The password for the email account.
  • From: The email account that the email will be sent from.
  • To: The email accounts that the email will be sent to, separated by commas.
  • CC: Email accounts that will be CC’d, separated by commas.
  • BCC: Email accounts that will be BCC’d, separated by commas.
  • Message Body: The body of the draft email.
  • Message Subject: The subject of the draft email.

Scrape Website

The Scrape Website operator is used in an Automation to extract text data from a given website. By providing a URL to the website you want to scrape, the operator will retrieve the raw HTML content of the webpage, as well as the HTTP status code returned by the server.

An Automation can use the Scrape Website operator for various purposes, such as:

  • Extracting specific text data or information from a website for further analysis or processing.
  • Monitoring changes in a website's content over time.
  • Collecting data from multiple websites for use in a larger project or dataset.
  • Scraping web pages to create a local copy of the content for offline use.

Remember: Ensure that scraping the website is allowed and abides by the website's terms of service. Unauthorized scraping could lead to legal issues or violations of the website's policies.

Input Fields (Settings / Field Map)

  • URL: This is the URL of the website that you want to scrape. The URL should be a valid web address from which data can be extracted.

Output Fields

  • HTML: This field contains the HTML content of the scraped webpage. It captures and stores the raw HTML of the webpage, which can be used to analyze or process the content retrieved from the website.
  • Status Code: This field captures the HTTP status code returned by the server. Status codes indicate the result of the scrape request, such as success (200) or not found (404).

Send Email

The Send Email operator is used in an Automation flow to send formatted or dynamically generated emails to one or more recipients. It can be used for various purposes such as notifications, transactional emails, marketing, and feedback and support.

Input Fields (Settings / Field Map)

  • Server Name / Address: This is the server name or IP address of the mail server. This can be found by looking up information about the mail server for your intended email.
  • Server Port: This is the port used for the mail server. This can be found by looking up information about the mail server for your intended email.
  • Server Type: This is the protocol that the mail server uses. The supported mail server protocols are Sendmail or SMTP.
  • Connection Security: The encryption method the mail server uses. The supported encryption methods are SSL/TLS and STARTTLS.
  • Username: This is the name of the email account for this mail server. The username must be a full email address, e.g., “user@example.com.”
  • Password: The password for the email account, e.g., “ExamplePassword1234.”
  • From: The email account to send mail from. You must have already established permissions to be able to send emails from this address on the server. Set this to your original email if you do not want to modify the address.
  • To: The email accounts to send mail to, separated by commas.
  • CC: Email accounts to CC emails to, separated by commas. This is an optional field.
  • BCC: Email accounts to BCC emails to, separated by commas. This is an optional field.
  • Subject: The subject of the email.
  • Body: The message body of the email.

Output Fields

For the “Send Email” operator, most of the Output fields will be the same as the values used within the Settings or Field Maps tabs. The only Output that is newly generated is the “Date Sent” field.

  • Date Sent: The time and date the email was sent.
  • Server Name/Address: The mail server name or IP address used to send the email.
  • Server Port: The port of the mail server used to send the email.
  • Server Type: The mail server protocol. Either IMAP or POP3.
  • Connection Security: The encryption method the mail server uses. Either SSL/TLS or STARTTLS.
  • Username: The email account attached to the mail server used to send the email.
  • Password: The password for the email account.
  • From: The email account that the email was sent from.
  • To: The email accounts that the email was sent to, separated by commas.
  • CC: Email accounts that were CC’d, separated by commas.
  • BCC: Email accounts that were BCC’d, separated by commas.
  • Message Body: The body of the sent email.
  • Message Subject: The subject of the sent email.

Transcribe Audio

The Transcribe Audio operator enables the conversion of audio files into text transcriptions. This process is crucial for various use cases where text-based analysis or processing is needed, and audio files need to be understood by machines.

The primary purpose of the Transcribe Audio operator is to transcribe an audio file generated by another action or trigger in an Automation workflow. This transcription process runs asynchronously, meaning that the operator does not produce the transcript directly. Instead, it initiates the transcription process, and other Automations can utilize the Transcription Trigger to start a flow that will handle the produced transcript.

To use the Transcribe Audio operator effectively, you would combine it with other operators like the AWS S3 GET operator, which is used to retrieve an audio file. The combination of these two operators will allow you to create a text file from an audio file, making it possible to analyze or process the audio content in new and innovative ways.

Input Fields (Settings / Field Map)

  • File Name: This is the name of the file that is to be transcribed. It is passed to the ASR, which uses the file name as the "Reference Label" for the transcription.
  • File Content: This is the actual content of the file—the binary data. It is the part of the file that makes up the file, which the ASR reads to perform the transcribing.

Output Fields

  • Transcription ID: The ID of the Transcription that was updated.
  • File Name: The file name, or the "Reference Label," for the transcription.

Transcription History

The Transcription History operator helps to maintain a log of all the activities performed on a particular transcription. It appends the output fields from the previous operators in the Automation flow to the Activity tab of a Transcription. This operator helps in keeping track of the various actions and changes made to the transcript throughout the Automation process.

Input Fields (Settings / Field Map)

  • Transcript ID: The ID of the Transcription that will be updated by the Transcription History operator.
  • Add Field Button (+): Use the plus button to add the output fields you want to append to the transcription’s history.

Output Fields

  • This operator does not produce any outputs that are available to be used by subsequent operators. To view the results of this operator, look at the Transcripts Activity tab.

Transcription Lookup

The Transcription Lookup operator is designed to help you access and utilize an existing transcript within an Automation flow. This is particularly useful when you want to take specific actions based on the content of a transcript, such as extracting information, sending it to other systems or applications, or evaluating it for insights.

Input Fields (Settings / Field Map)

  • Transcript ID: The ID of the Transcription that will be looked up.

Output Fields

  • Transcript ID: The ID of the Transcription that was looked up.
  • Transcription: The full text of the Transcription. This will include everything, such as timestamps and speaker names.
  • Reference Label: The reference label for the Transcription that was processed. This is essentially the “name” given to the Transcription.
  • Description: The description associated with the Transcription that was processed.
  • Status: The current status of the Transcription that was processed.
  • Speakers: The names of any speakers associated with the Transcription that was processed.
  • Tags: Any tags that were applied to the Transcription that was processed.
  • Created: The date and time when the Transcription that was processed was created/uploaded.

Transcription Update

The Transcription Update operator allows the Automation flow to update and modify various fields and history of a given Transcript. This can be particularly useful when working with large volumes of audio files or when multiple processing tasks need to be performed on a single Transcript.

Input Fields (Settings / Field Map)

  • Reference Label: This is the “name” given to the Transcription.
  • Transcript ID: The ID of the Transcription that is to be updated.
  • Description: The description associated with the Transcription.
  • Status: The status of the Transcription.
  • Speakers (Comma Separated): The names of any speakers associated with the Transcription.
  • Tags (Comma Separated): Any tags that are applied to the Transcription to help identify the Transcription and can be searched on.
  • File Path: The file path where the original audio file can be found that was used to produce the Transcription.
  • Activity History (Append To): Any text or output from a previous automation that needs to be added to the Transcript’s history. It is viewable on the Transcription’s Activity tab.

Output Fields

  • Transcript ID: The ID of the Transcription that was updated.
  • Transcription: The full text of the Transcription. This will include everything, such as timestamps and speaker names.
  • Reference Label: The reference label for the Transcription that was processed. This is essentially the “name” given to the Transcription.
  • Description: The description associated with the Transcription that was processed.
  • Status: The current status of the Transcription that was processed.
  • Speakers: The names of any speakers associated with the Transcription that was processed.
  • Tags: Any tags that were applied to the Transcription that was processed.
  • Created: The date and time when the Transcription that was processed was created/uploaded.

Glossary of Terms

Actions

Action Operators are the components used to continue the Automation Flow after a Trigger Operator has been activated. They perform a wide variety of tasks such as running an Activity, scraping a website, transcribing audio, or sending an email. Actions enable the execution of specific tasks within an automation, guiding the flow toward achieving its objectives.

Activity

Activities are predefined sets of instructions or actions that can be executed within various areas of Symbient AI. An Activity is typically associated with an LLM Model and involves tasks like summarizing a transcript, extracting specific information from text, or performing other natural language processing tasks. Activities are integral to automating complex tasks that require language comprehension and processing.

Automation

Automations are in-depth logic systems that perform a series of tasks automatically. These systems are built using individual steps called Operators, which can handle functions like reading or sending emails, running an Activity, passing text to an LLM Model, or writing data to a webhook. By chaining these Operators together, you create an “Automation Flow,” allowing complex processes to be executed seamlessly.

Automation Flow

An Automation Flow is the sequence of steps or operations that an Automation follows. It is designed and set up in the Flow tab of Symbient AI, where the logic of the Automation is defined. The flow dictates the order in which actions are performed, starting from the Trigger Operator and moving through a series of Action Operators.

Field Mapping

Field Mapping is the process of connecting Operator fields to output fields from Operators that are earlier in the Automation Flow. For example, you might retrieve the text from a transcription using the Transcription Lookup operator and then map that data to the Input field of an LLM operator. This allows data to flow seamlessly between different steps in the Automation, ensuring that each Operator has the necessary information to perform its function.

Instruction

Instructions are used to give detailed step-by-step directions for the AI to follow in order to complete a specific task, typically in a more structured manner. They are often used when the AI needs to perform a complex or multi-step operation.

Instructions are more structured and tend to follow a specific format that outlines the necessary steps for the AI to complete a task. They are often written in a more direct tone, using words like "do," "perform," or "execute" to guide the AI.

Operator

Operators are the building blocks of an Automation. They are the individual steps within an Automation Flow, each designed to perform a specific function or task. Operators can either trigger actions, process data, or interact with external systems, making them essential for creating effective and dynamic Automations.

Prompt

Prompts are generally used to provide context, request information, or initiate a conversation with an AI. They usually seek a response or action from the AI to help guide the conversation or task.

Prompts are often open-ended, allowing for flexibility in the response or action provided by the AI. They can be as simple as a question or as complex as a detailed scenario.

Trigger

Triggers are Operators that initiate the start of an Automation Flow. They are activated based on specific conditions or events, such as receiving an email, a scheduled time, or a webhook call. Triggers are essential for starting the sequence of actions that make up an Automation.